Getting started
We provide a command line interface for training and evaluating your models.
Assuming you have installed the package using pip, you can use the command vis4d to access the CLI.
Alternatively, you can run the CLI using python -m vis4d.engine.run.
It might be useful to use the engine together with torchrun, …, etc.
The CLI relies on a configuration file to specify each experiment. We use ml_collections as underlying framework to define the configuration files.
Overview
The overall design of Vis4D can be dvidied into Training (fit) and Inference (test).
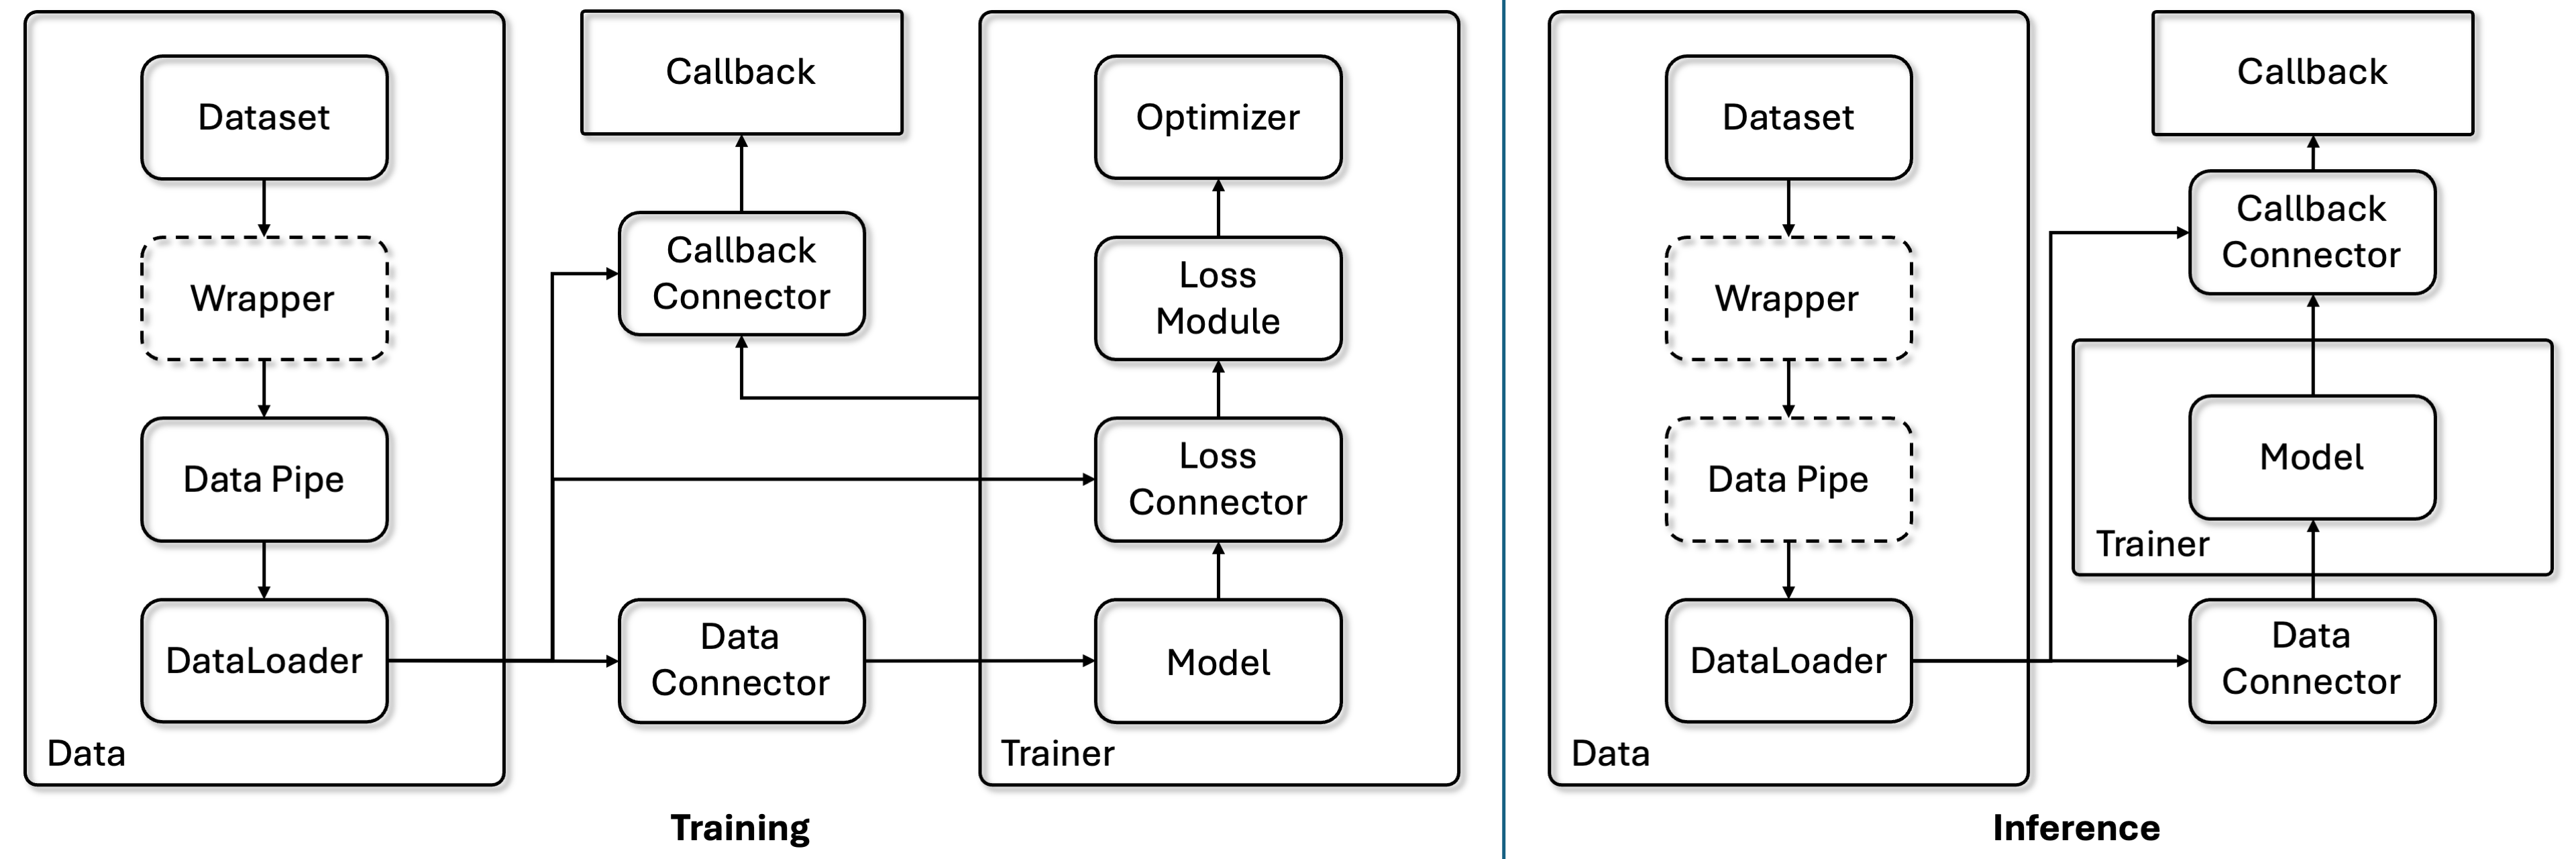
We use PyTorch Lightning as the Trainer and use the design of Connector to connect data, model, loss, and callbacks.
Data and Output Directories
You can use the library in different folder structures and codebase.
By default, Vis4D will use the following directories for datasets used in the experiments:
--root
    --data
        --dataset1
        --dataset2
You can change the data root according to your need in the config. Check more details in the Data section.
Vis4D will dump the output, e.g. model weights, evaluation and visualization results, log, …, etc, to the output_dir.
This output folder is decided by your config.experiment_name and config.version, and config.work_dir (“vis4d-workspace” as default).
The default output folder structure is:
--root
    --vis4d-workspace
        --experiment_name1
            --version1
            --version2
        --experiment_name2
            --version1
            --version2
Interface
The provided examples assume that the experiment configuration file is located at path_to_experiment_cfg.py.
vis4d [fit | test] --config path_to_experiment_cfg.py
                   --ckpt: Checkpoint path
                   --gpus: Number of GPUs per node
                   --nodes: Number of nodes
                   --print-config: If set, prints the configuration to the console
                   --resume: Resume training
                   --vis: If set, running visualization using visualizer callback
                   --wandb: If set, use Weights & Biases logging
Using fit to train the model and test to test the model.
For more details about our config system please check Config System.
Flags
The followings are the flags to be used for CLI. You can find how the engine uses these flags here.
--config
Path to config file [.py |.yaml].
--ckpt
Checkpoint path.
Can be used for testing, model pre-trained weights, or for resume training.
--gpus
Number of GPUs per node to use.
Default value is 0 which will use CPU for training and testing. For more than 2 GPUs, our trainer will use Distributed Data Parallel (DDP) for multi-gpu training and testing.
--nodes
Numbers of nodes to use.
Default value is 1. If you want to use multi-node training, please configure the multi-node scripts according to your own system.
Example shell script for using sbatch with vis4d:
#!/bin/bash
#SBATCH --job-name=Vis4D
#SBATCH --time=02:00:00
#SBATCH --nodes=2
#SBATCH --ntasks-per-node=4
#SBATCH --gpus-per-node=4
#SBATCH --output=log/%j.out

srun vis4d fit --config path_to_experiment_cfg.py --gpus 4 --nodes 2
--print-config
The conifg used for the experiment (for both fit and test) will be dumped as yaml file under the output folder. Set this flag will also print the configuration to the console so you don’t have to check the dumped yaml file.
--resume
Resume model training.
There are two resuming mechanism.
If the
ckptflag is set, then the trainer will restore the training stage from the provided checkpoint.
vis4d fit --config path_to_experiment_cfg.py --ckpt test.ckpt --resume
If the
ckptis not set, then the trainer will try to restore the training stage from the latest checkpoint from the output folder. Which means you need to make sure your experiment name and version are set to the model you want to resume training and thelast.ckptis stored undercheckpointsfolder under the specified output folder.
vis4d fit --config path_to_experiment_cfg.py --config.experiment_name exp_1 --config.version first_trial --resume
--vis
If set, running visualization using visualizer callback.
Since some visualization is only for dumping results or debugging, so by default without this flag, the engine won’t trigger the visualization callback.
--wandb
Weights & Biases is the powerful for logging the training and recording the experiments. If set this flag, then the engine will use it as the logger.
Make sure to install wandb first and log in to the desired account.
Overwrite Config Parameters
We support overwriting config parameters via the CLI.
Assuming you have a config parameter params.lr in your config file, you can overwrite it using the following command:
vis4d fit --config path_to_experiment_cfg.py --config.params.lr=0.01
Note that when misstyping a config parameter:
vis4d fit --config path_to_experiment_cfg.py --config.params.lrs=0.01
It will result in the following error:
AttributeError: Did you mean "lr" instead of "lrs"?
Check here for CLI demo.
Python API
You can also enjoy vis4d python api directly and compose your own application using the functor we provide.
Check here for API demo.